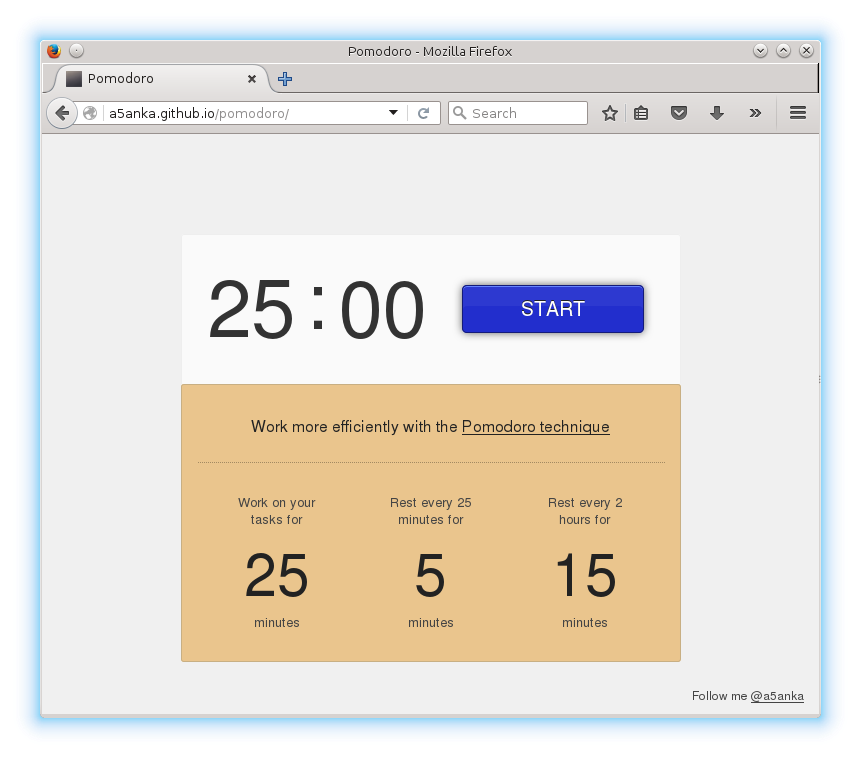
Looking for an online Pomodoro timer is the first thing most of us do
after reading about Pomodoro technique. I also did the same and
found many Pomodoro Timers online. But I did not like the ones I found
very much. Most of them were Flash based (I am sorry I am not a big
fan of Flash based apps =D), and some Pomodoro Timers were more than
just Timers. I was looking for a minimalist interface.
The Pomodoro Timer created by Ryhan Hassan was a very good fit
for what I was looking. He had done a very good job in creating a
Pomodoro timer. But it was not using desktop notifications and the
timer was not available online.
Therefore I decided to fork the his github repo and add the missing
features to suit my requirements. I also hosted the modified tool along
with my blog.
Pomodoro Timer start page with a brief introduction on Pomodoro techniqueA digital clock and a progress bar is shown when you start a PomodoroTimer for the break is automatically started when a Pomodoro is done
Normally when you use GIT for a long time, you end up with a huge list
of branches in both local and remote repository. In this post I
explain how you can get rid of that clutter.
Deleting branches in the local repository
I assume you know how to list local branches in the repo (Simply use
1
git branch
). There are couple commands you can use to delete a
local branch. Following command is the safe one to use when deleting
local branches. It prevents users accidentally deleting a branch which
is not fully merged in its upstream branch, or not in HEAD if no
upstream was set with –track or –set-upstream.
$ git branch -d <branch-name>
You will get the following error if you try to delete a branch which
is not fully merged.
$ git branch -d <branch-name>
error: The branch 'branch-name' is not fully merged.
If you are sure you want to delete it, run 'git branch -D branch-name'.
In that case you can use
1
-D
option to force branch deletion.
$ git branch -D <branch-name>
Deleting branches in remote repository
There are couple git commands you can use to delete a git branch in a
remote repository. Please note that the following examples assume the
remote name as “origin”. After Git v1.7.0 you can use the
`–delete’ option with git push to delete a remote branch.
$ git push origin --delete <branchName>
If you are using an older version you can use the command mentioned
below.
$ git push origin :<branchName>
Both the commands have the same effect. Therefore you can use the one
you like. For me the first command feels more natural.
Creating a Git alias to delete both local and remote branches
You can create a Git alias if you find yourself executing these two
commands together most of the time.
“If you don’t like testing your product, most likely your customers won’t like to test it either.” - Anonymous
A message broker or any other software should always be tested
extensively to make sure it is working as expected. That is why we
always try to improve the way we are testing WSO2 MB. Since WSO2 MB is
used mostly in clustered mode, we need to test and see how WSO2 MB
behave in a clustered environment. Prior to WSO2 MB 3.0.0, this was a
manual process which resulted in wasting valuable time and
resources. I am writing this post to tell you how to configure and run
the clustered integration tests introduced in WSO2 MB 3.0.0.
We have not still automated the MB cluster creation process yet. In a
future release we will be able to automate this process also. But for
the moment we have to create the cluster manually. With the removal of
Apache ZooKeeper dependency from WSO2 MB, this is not very hard
to do. I am not going to describe how to setup a MB cluster in this
post. You can follow the WSO2 MB documentation to properly setup a MB
cluster.
Configuring test framework
I am using a two node WSO2 MB cluster for this example. Let’s assume
the MB Node details in the cluster are as follows,
MB Node 1
Host name/IP: 192.168.1.5
HTTP port : 9763
HTTPS port : 9443
AMQP port : 5672
MQTT Port : 1883
MB Node 2
Host name/IP: 192.168.1.6
HTTP port : 9763
HTTPS port : 9443
AMQP port : 5672
MQTT Port : 1883
1. First We have to enter this node information in the automation.xml file of
the tests-clustering module. An example configuration is mentioned
below
<!--
This section will initiate the initial deployment of the platform required by
the test suites.
--><platform><!--
cluster instance details to be used to platform test execution
--><productGroupname="MB_Cluster"clusteringEnabled="false"default="true"><instancename="mb002"type="standalone"nonBlockingTransportEnabled="false"><hosts><hosttype="default">192.168.1.5</host></hosts><ports><porttype="http">9763</port><porttype="https">9443</port><porttype="qpid">5672</port><porttype="mqtt">1883</port></ports><properties></properties></instance><instancename="mb003"type="standalone"nonBlockingTransportEnabled="false"><hosts><hosttype="default">192.168.1.5</host></hosts><ports><porttype="http">9763</port><porttype="https">9443</port><porttype="qpid">5672</port><porttype="mqtt">1883</port></ports><properties></properties></instance></productGroup></platform>
2. Also edit the datasource information in the automation.xml
to match your MySQL database configuration for the message
store. Please note that we currently only support MySQL database for
Cluster Testing even-though WSO2 MB supports several database systems
like MySQL, MSSQL, and Oracle.
<!--
Database configuration to be used for data service testing. DB configuration in dbs files will be replaced with
below configuration at test run time
--><datasources><datasourcename="mbCluster"><url>jdbc:mysql://localhost/WSO2_MB</url><username>root</username><password>root</password><driverClassName>com.mysql.jdbc.Driver</driverClassName></datasource></datasources>
3. We have to also change the value of “skipPlatformTests” property to
false in the
pom.xml
of tests-clustering module to enable clustered integrations tests.
It is a pain to do all these configuration every time we need to run
cluster tests. What I do to avoid that is keeping all these configuration
changes in GIT stash. Then when ever I need to run the cluster tests,
I can simply apply the stash and run tests.
Double Curly braces are reserved characters in the Jekyll world. Double curly braces can be used to refer to internal variables and functions. Therefore we have to escape them if we want to have them as texts. The common use case is when you want to show some Jekyll examples like in this post. You can achieve this by using the “raw tag” available in Jekyll.
See the code below for an example.
{% raw %}{{some.var}}{% endraw %}
An alternative method is to use double quotes to make part of it a string literal.
{{"{{ some.var "}}}}
Hope this helps you in writing your next Jekyll posts.